Sell at the Front Desk
The New sale screen is built for a line at the counter: pick the day, tap the activity and time, set the number of guests and take payment. Each sale is saved as a booking, so it holds the spots and shows up at check-in like any online booking.
Make a sale
- Go to New sale (under Today in the menu).
- Pick the day. Click Today or Tomorrow, or choose a date and click Show day.
- Find what you're selling. Use the Activities, Events and Add-ons tabs, the Popular row, or the search box (press / to jump to it).
- Choose a time and the guests. Each time shows how many spots are left. Set the quantity for each guest type and click Add to sale. Repeat for anything else on the order.
- Add a customer if you want one (see below), and an Internal note for staff if needed.
- Take payment with one of the buttons under the sale. See Cash, Card and Other Payments at the Desk.
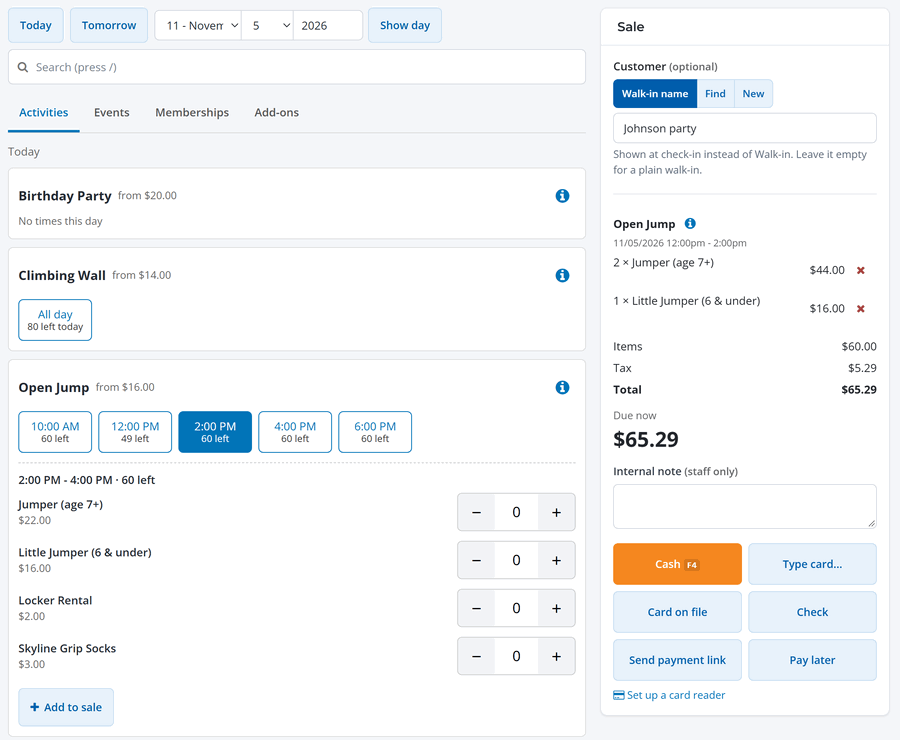
- Click the i on an item to see its details, such as what's included and any deposit.
- Sold-out times stay on the screen so staff can tell guests what's full. Administrators can go over the spots left by checking Go over the spots left and giving a reason, which is saved on the booking.
- Member prices and account credits apply when the customer has them.
- To remove a line, use the remove button next to it in the Sale panel. Nothing is saved until you take payment or choose Pay later.
Walk-ins and customers
A customer is optional. Above the sale, choose one of three options:
- Walk-in name: type a name for the group, like "Smith party". It's shown at check-in and on the booking instead of "Walk-in". Leave it empty for a plain walk-in.
- Find: search your customers by name, phone or email. Once you pick someone, their last three bookings show with Book again, which fills in the same activity, time and guests for the day you're viewing.
- New: add a customer with their name and a phone number or email.
Some things need a customer: a deposit, Pay later and Send payment link. If a walk-in group wants a receipt by email later, or you want them in your customer list, open the sale and use Add customer details, or choose one of the adults who signed a waiver with their email as the customer.
Deposits
If a package takes a deposit, the sale shows Pay in full and Deposit. A deposit needs a customer and a booking on a later day. The rest stays due on the booking, and you can collect it later from Find booking or the booking itself.
Memberships
The Memberships tab links to the New membership page, where staff (Moderator and up) sell a membership as its own checkout. See Managing Members.
Waivers at the desk
After the sale is saved, each guest shows as Signed or Not signed. For anyone still to sign:
- Sign on this device opens the signing page in a new tab, so the guest can sign on the desk computer or tablet.
- Text waiver link (if you use text messaging) or Email waiver link sends the link to the customer.
Administrators can turn on Require waivers before payment in the New sale settings (the gear at the top right). Staff then click Save booking, then collect waivers, and payment opens once everyone has signed. It's off by default. Check-in still checks waivers either way.
Set up the Popular row. In the New sale settings, pick up to 8 activities and events to show above the tabs. Staff reach your best sellers in one tap.
Receipts
When the sale is paid in full, choose how the guest gets their receipt:
- Email receipt or Text receipt (if you use text messaging).
- Print receipt on your receipt printer, when you have one: a small receipt from the printer at the desk. With only one receipt printer it's used automatically; with several, pick this computer's at the top of the screen. See Receipt Printers and Cash Drawers.
- Print full-page receipt (or Print receipt if you don't have a receipt printer) opens the receipt in your browser to print on a regular printer or save as a PDF.
Then click Start new sale, or No receipt to skip it. For card reader payments to a named customer, Stripe also emails its own receipt.
Find a booking
Click Find booking at the top of the New sale screen to look up any booking by name, phone, email, booking number or guest name. You can also scan the guest's check-in QR code with a USB or Bluetooth barcode scanner, from anywhere on the page: there's no need to click the search box first, and a ticket opens its booking straight away. A membership card or a waiver's QR code isn't a booking; check those in with the Venue app's scanner. The page also lists Today's front desk sales with a balance. Open a booking to see Total, Paid and Balance due, check its waivers, and collect payment under Take payment.
A sale that hasn't been paid yet can be cancelled with Cancel this sale. The booking is cancelled and its spots are freed. Once a payment is taken, use the booking page to cancel or refund (see Reschedule, Cancel or Change a Booking).
Keyboard shortcuts
On a computer, press ? or click Keyboard shortcuts to see them all. The most used: / search, Enter in a quantity to add to the sale, F2 card reader, F4 cash and F8 no sale.