Receipt Printers and Cash Drawers
Print receipts at the desk and have the cash drawer open on a cash sale. The drawer plugs into the receipt printer, so you set up the printer first. Both are optional: you can always email or text a receipt and use a drawer with its key.
Which printers work
In the web admin
The web admin prints to Star printers with CloudPRNT. The printer connects to your network with a cable and picks up print jobs from WaiverFile over the internet, so it works with any computer or tablet at the desk. Models:
- Star mC-Print3 and mC-Print2
- Star TSP100IV (TSP143IV)
- Star TSP650II and TSP700II with the CloudPRNT interface
Use 80mm (standard) or 58mm (narrow) receipt paper. These receipts are text only: your business name, the items, totals and payments, and optionally your address and phone. They print when staff press Print receipt on the printer (on the New sale screen or a booking's receipts menu), not automatically. USB printers aren't supported.
In the WaiverFile Venue app
The Venue app prints straight to a Star printer on your network, or over Bluetooth (Android, or iOS printers with Apple MFi Bluetooth). Supported models include the mC-Print2 and mC-Print3, mPOP, TSP100 and TSP143 (II, III and IIU), TSP100IV, TSP650II, TSP700II, TSP800II, SP700 and the SM-S and SM-T mobile printers. USB and Bluetooth Low Energy aren't supported. See The Front Desk in the WaiverFile Venue App.
Add a CloudPRNT printer
- Add the printer. Go to Check-in & devices › Devices, click the Printers & drawers tab, then Add a printer. Enter a Printer name, pick the paper size and click Add printer.
- Copy the address shown. It's also the printer's password, so it's shown only once. If you lose it, choose New address on the printer's row.
- Find the printer's IP address. Connect the printer to your network with a cable, and print its self-test page by holding the Feed button while you turn it on.
- Open the printer's settings page. On a computer on the same network, go to http:// and the printer's IP address, and log in (Star's default is user root, password public).
- Turn on CloudPRNT. Paste the address as the Server URL, set the polling interval to 5 seconds and save. The printer restarts.
- Click Print test page on the printer's row to check it works.
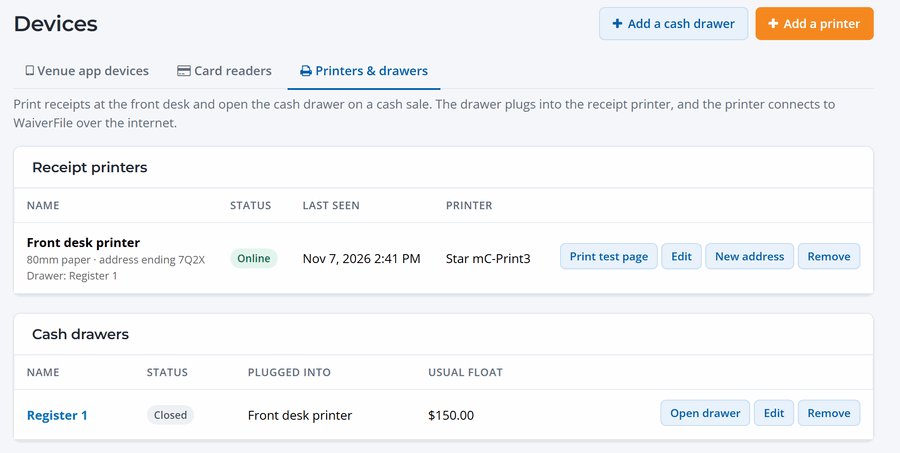
Each printer shows whether it's online and when it was last seen. Use Edit to rename it, change the paper, or print your business address and phone on receipts. If a different printer tries to use the address, it's refused and the page shows Allow that printer in case you replaced it.
Add a cash drawer
- Plug the drawer's cable into the receipt printer.
- Click Add a cash drawer on the Printers & drawers tab of Check-in & devices › Devices. Enter a Drawer name (like "Register 1"), choose the printer it's Plugged into, and enter your Usual opening float.
- Choose Blind count if you want staff to count the cash before they see what's expected.
- Click Add drawer, then use Open drawer on its row to test it.
Add one drawer for each register. Once a drawer exists, Cash drawer appears in the menu. See Open, Count and Close the Cash Drawer.
Choose the printer and drawer for each computer
At the top of the New sale screen, each computer or tablet picks its own cash drawer and receipt printer. The browser remembers the choice. If you have only one receipt printer, it's used without picking. From then on:
- The drawer opens on a cash or check payment, the opening float, a paid in or paid out, the count, and No sale (F8). Every open is logged with who opened it and why.
- Print receipt on your printer appears on the receipt step, next to Print full-page receipt for a regular printer.
- On a booking's page, the receipts menu has Print receipt on each receipt printer too.
With no printer, or if someone opens the drawer with its key, the drawer works by hand and WaiverFile can't tell it was opened.
Receipts & Tickets layouts
Under Check-in & devices › Receipts & Tickets you choose what WaiverFile Venue devices print: booking receipts, waiver receipts, tickets, member cards, check-in passes and front desk slips. You can add your logo, a black and white receipt logo, pictures, your own text, promotions and QR code links, and preview each layout before you save. These layouts are used by printers connected to the Venue app. Receipts printed from the web admin use the text layout described above.