How to Take Photos of Waiver Form Signees
WaiverFile has a feature to take photos of the person signing your waiver. This feature works when customers sign waivers in the WaiverFile Venue app on an iPad, iPhone or Android device.
Setting it up is easy.
1. Setup the photo steps you would like to include in your waiver signing process.
Begin in the dashboard, and go to Waiver options › Photos & attachments (classic menu: Settings › Photos & attachments). This page will show you a list of all the photo steps you have. To add a new step, click Add an item on the top-right and check On the WaiverFile Venue app.
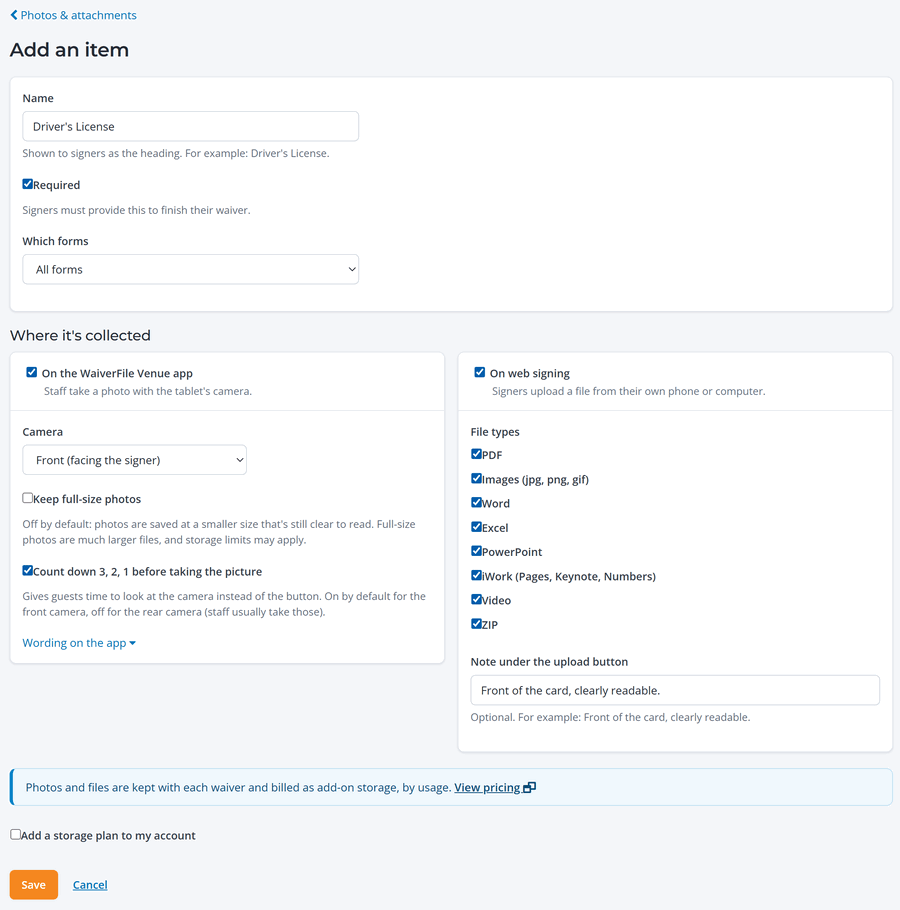
The form to create each photo step includes a number of options. Here each of the options are explained:
| Name |
Appears on the top of the photo screen in the app. |
| Camera |
Use the front camera to take a picture of the person signing their waiver. This is the camera that faces the user. Use the rear camera to capture a photo of a document. If you are using an enclosure with a document tray, the rear camera will line up with the document in the tray for a clear image. |
| Which forms |
You can choose if this photo step applies to all your forms or just certain ones. |
| Keep full-size photos |
By default, photos are saved at a smaller size that's still clear to read, which saves space in your storage account. Check this to keep full-size photos instead. Full-size photos are much larger files. |
| Required |
If this box is unchecked, users can skip this step. |
| Wording on the app |
This series of fields lets you customize the wording of the buttons and labels on this photo step. For example you could reword the "Take Picture" button to something else like "Take Photo". If you are setting up steps for multiple languages, we recommend making steps for each language and customizing this wording. Then use the form selection options to place the steps on their corresponding forms. |
| Instructions before the camera opens |
If specified, this will display a popup message to the user before prompting for the photo. Use this if you need to outline specific instructions, such as how to place a document in a scanning tray. |
| Add a storage plan to my account |
This box must be checked to confirm that you wish to add a storage plan. To store photos and documents, we have an add-on storage plan that is billed in addition to our normal waiver plans. Learn more at our pricing page. |
2. Get the WaiverFile Venue app
Photo steps run in the free WaiverFile Venue app on an iPad, iPhone or Android device:
3. Sync your device
When you set up a new device from Check-in & devices › Devices (classic menu: Settings › Devices), your photo steps load automatically. See Get the WaiverFile Venue App.
A device that's already set up picks up new steps on its own when it syncs. To load them right away:
- Open staff settings: tap your logo or business name at the top five times quickly, then enter the unlock code.
- Tap Sync forms and events now.
- Go back and sign a waiver. The photo steps appear after the agreement step.
If the camera can't be opened in the app, guests can choose Use the camera app instead.

How to View Photos of Waiver Signees
Once photos are collected, they are sent to our secured cloud service where they are encrypted and stored securely. If your device is offline, it will send them once internet is restored. In staff settings, Waivers on this device shows anything waiting, and Send now sends it right away.
To view the photos attached to each waiver, log into your dashboard and find a waiver either under Waivers › Signed Waivers (classic menu: Dashboard) or search. Click to View the waiver. The images are displayed below the customer's signature. If you click on an image, it will download a copy directly. If you print or save a waiver to PDF, it will also include the images as part of the document. Likewise, if you use Waivers › Bulk download (classic menu: Archive › Bulk download), the PDF's will each include a copy of the images.
How can I see which waivers have photos at a glance?
To quickly show which customers have submitted photos, you can add a column to your dashboard to show a photo icon when one or more photos have been added. To do this, log into your dashboard, go to Waivers › Signed Waivers and click Customize layout. In each section that applies to you, select Choose Columns. On the left you will see two options: "Has Photos" and "Photo Count". "Has Photos" displays a picture icon when one or more photos are present. "Photo Count" displays the number of photos that have been attached. These same fields are also available in the reporting tool as well.