How to Setup and Use Workflows
The Workflows feature in WaiverFile is a powerful way to organize your waiver forms into different groups as well as handle when multiple separate forms are required. In this article we will go over how to setup workflows, what the signing process looks like, and a few example setups to demonstrate ways to use this feature.
To get started, log into your dashboard and select Workflows on the left. Click New Workflow on the top-right.
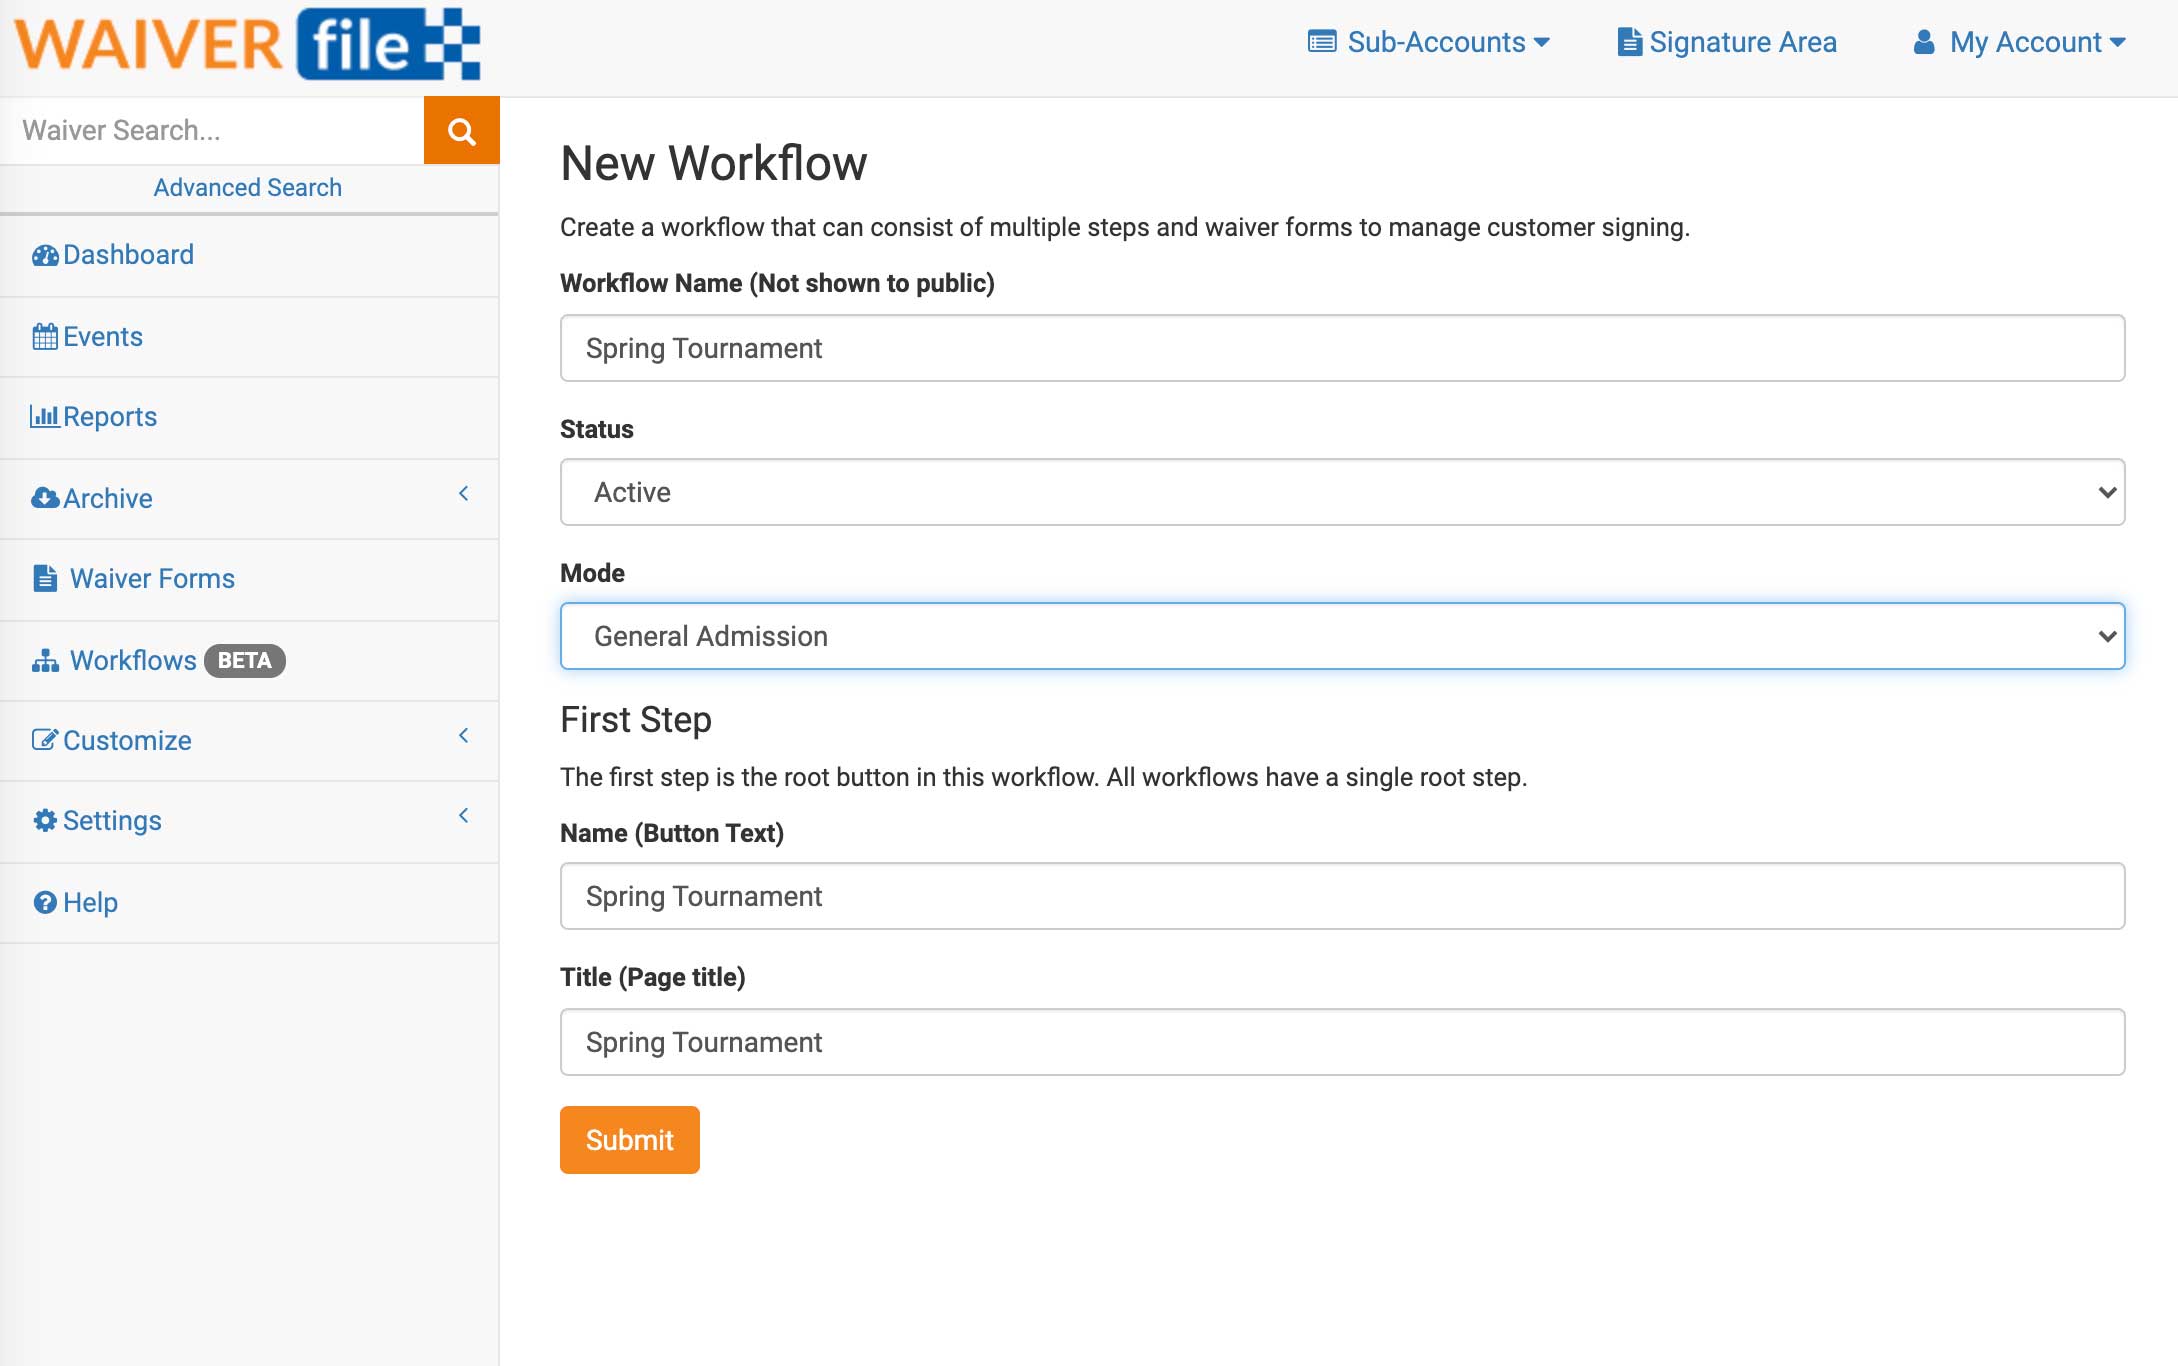
Start by giving your workflow a name. The name you enter will fill in the name and title boxes below automatically. You can change these to anything you like. The Workflow Name is an internal name and is not shown to the public, so you can use this to identify workflows for your own use. Under the First Step section, the Name (Button Text) will set the text on the button that is shown on the first signing page. The title appears as a page title when navigating to that step. For Mode, choose if your button will appear on the main page (general admission) or be available to tie to events, or both. When using events, you will see the workflow as an option in addition to individual forms when creating an event.
After saving, you’ll be taken to the Workflow editor. Here is a breakdown of the different options inside.
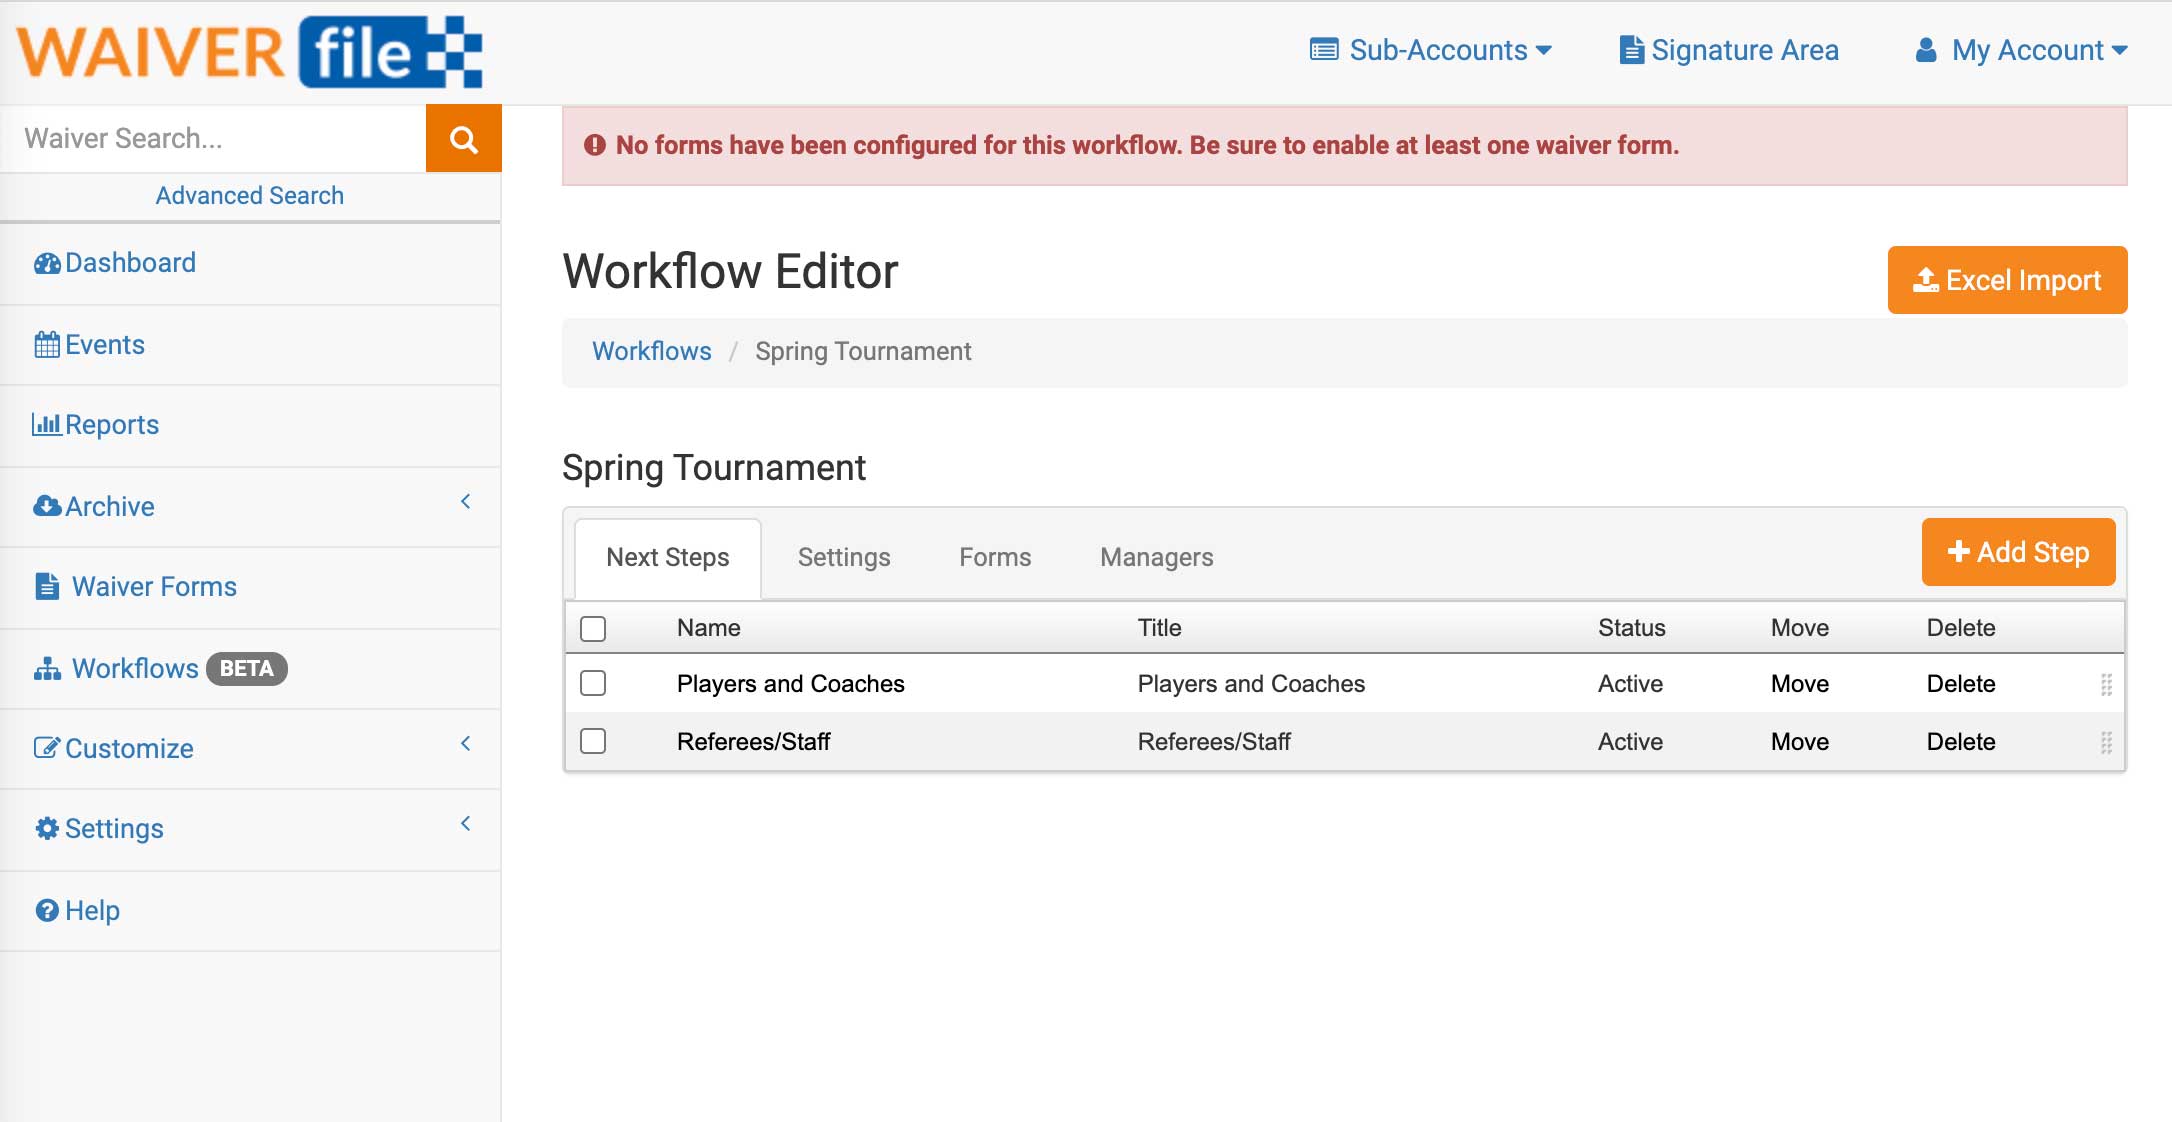
Next Steps
With workflows, you can create a tree of different “steps” to organize things. Each step appears as a button to choose from, so you can create any type of layout you need. For example, if you were running a sports tournament, you could break it into divisions, teams, boys/girls teams, and more.
Settings
Name - The name of the step. Shown on the button when selecting each step.
Title - Page title when navigating to this step/
Step Status - Use this to make steps inactive or active. Inactive steps are hidden.
Email Template - Option to use a custom email template. Inherit will use the template of a parent step, or your account default if you are on the first step. Setup email templates under Customize >> Email Templates.
Email Mode - Choose if a confirmation email is sent automatically, offered (a button is displayed to request the email), or disabled completely. Inheriting the setting will use a parent step or the account default if on the first step.
Confirmation Message - Choose a custom confirmation message. Setup messages under Customize >> Confirmation Templates
Where to place forms - Choose if the forms you have selected are offered here at this step, or at the end of each path. For example, if you want to offer a form at the current step but different forms within each child step, you woul choose “Here”. Alternatively, if you were going to import a long list of teams and each one gets the same forms, choose “At the end of all child paths”. This will direct users to click through to child steps and when they get to the end, they will be shown the form(s).
Form Selection Mode - If users are meant to sign just one form, select “Choice”. They will be presented with a list of buttons, one for each form. If they need to complete all the forms, choose “Series” and they will be stepped through the completion of each of the forms. (Some forms can be made optional which will allow them to skip).
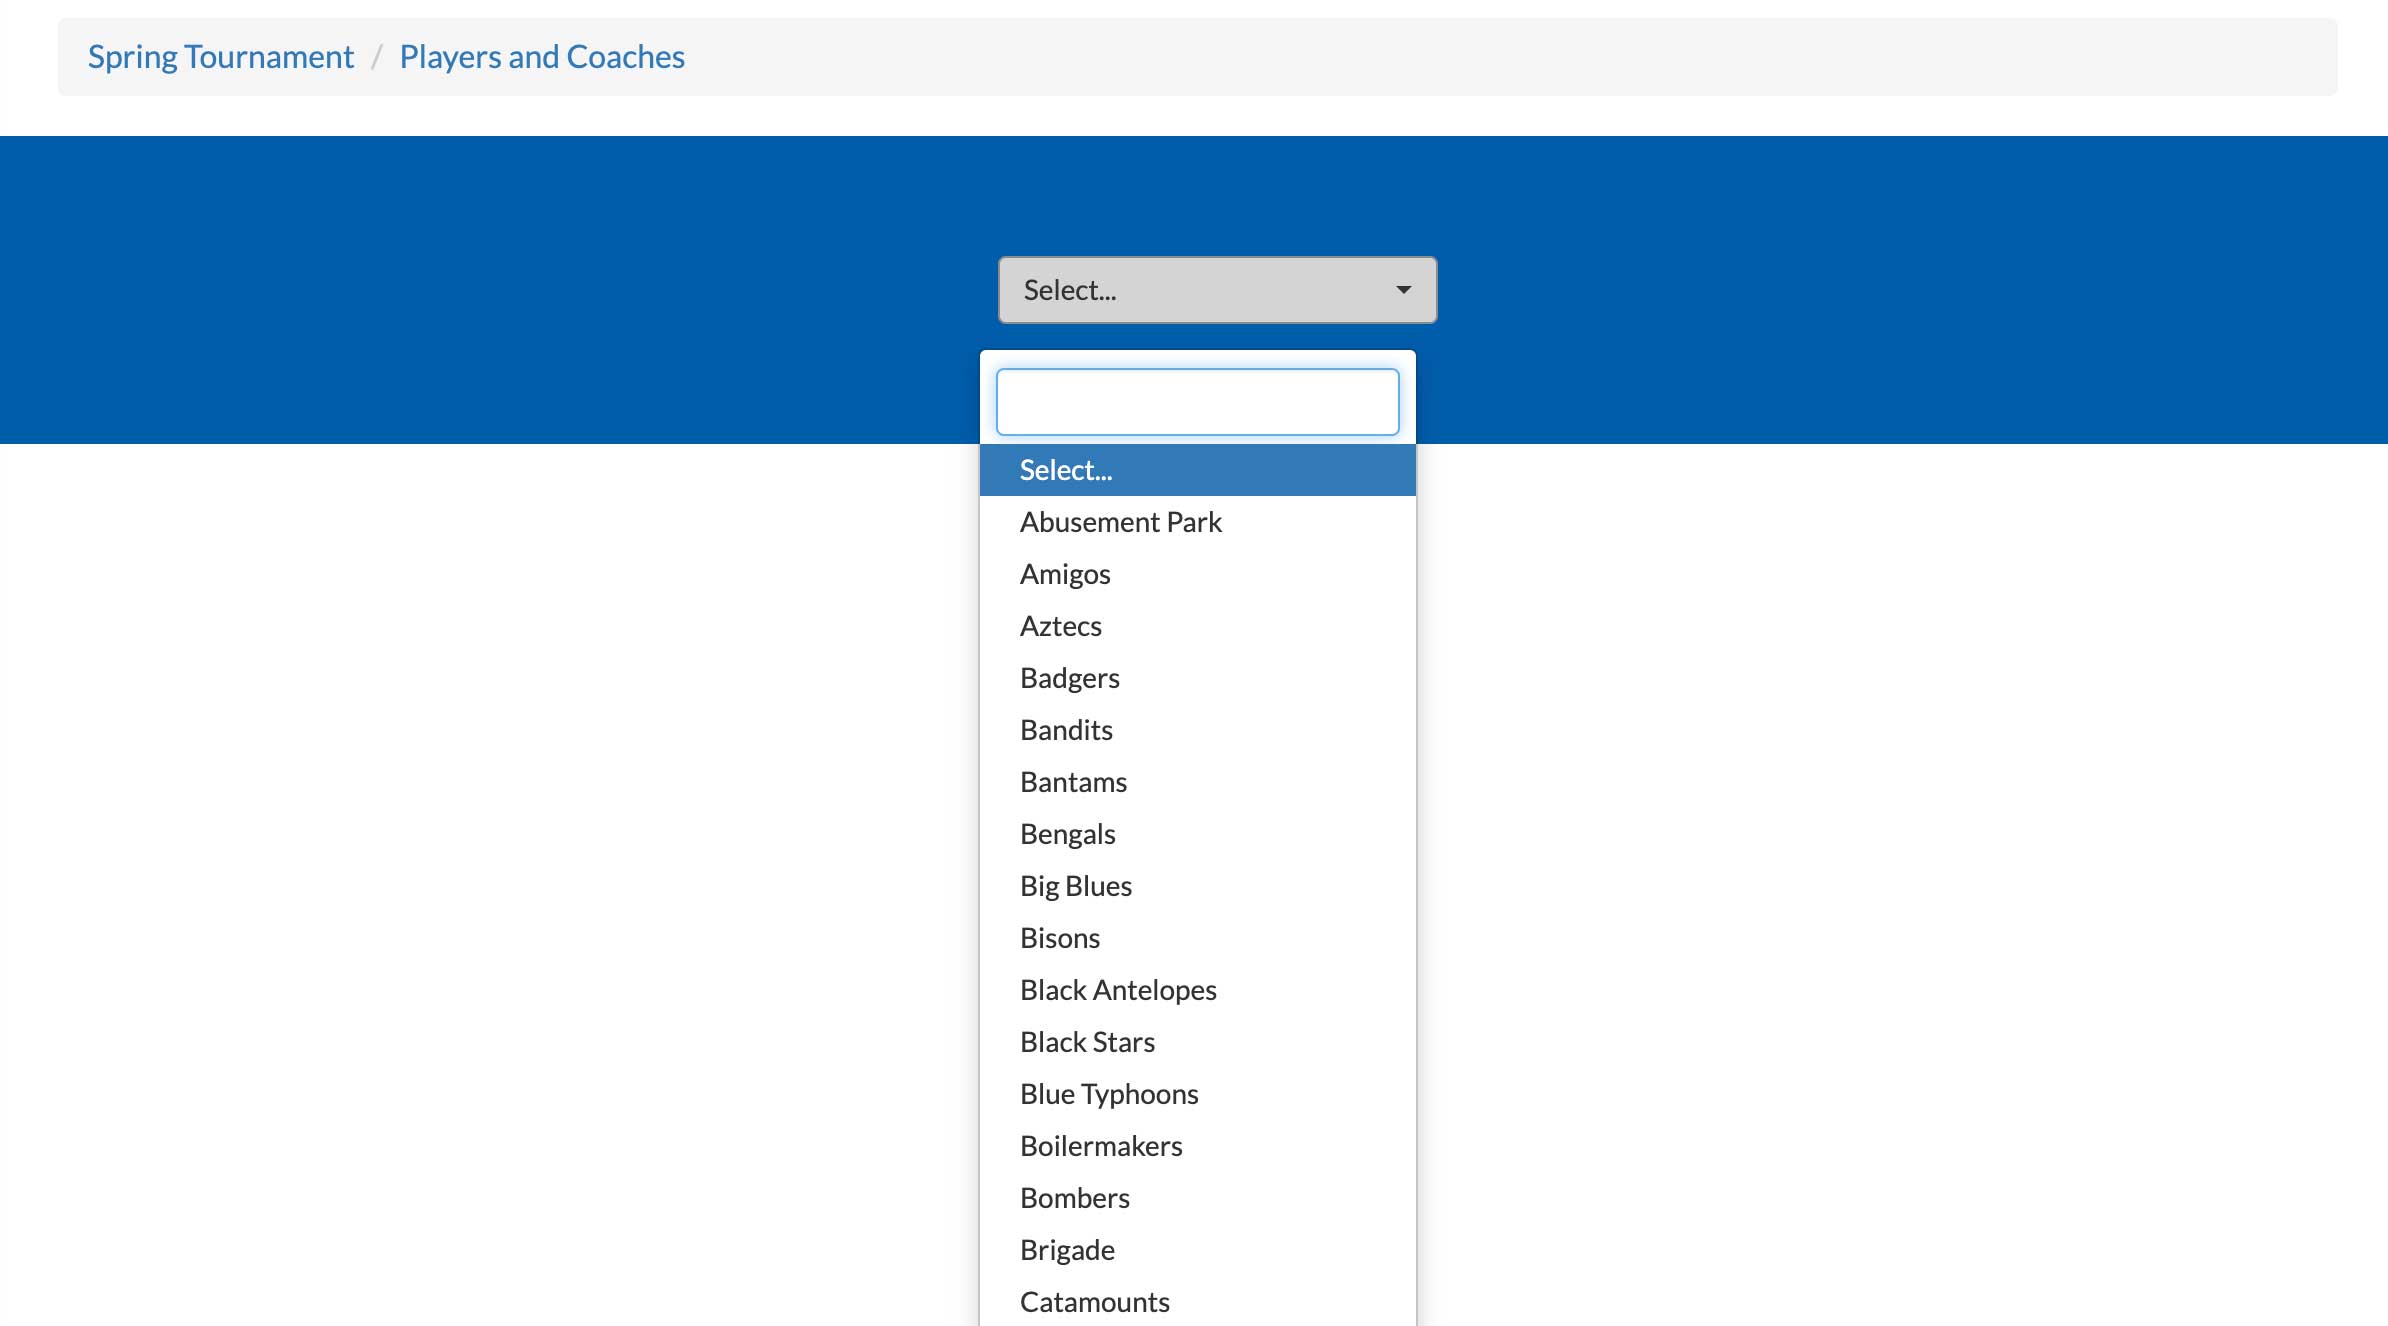
Alternate Step Selection Mode - When enabled, this adds a question to each child where the step can be selected. This is commonly used for sports tournaments when teams are being selected. You first get to the form by selecting one team, but if signing for multiple kids who are on different teams, this will add a drop down list where parents can choose a different team for each child on one form.
Alternate Step Label - By default, the label on the aforementioned alternate step reads as “Select” but you may wish to change this. For example, if the steps here represent teams, you could change this to “Team” and it would show on the form as a dropdown list with that label.
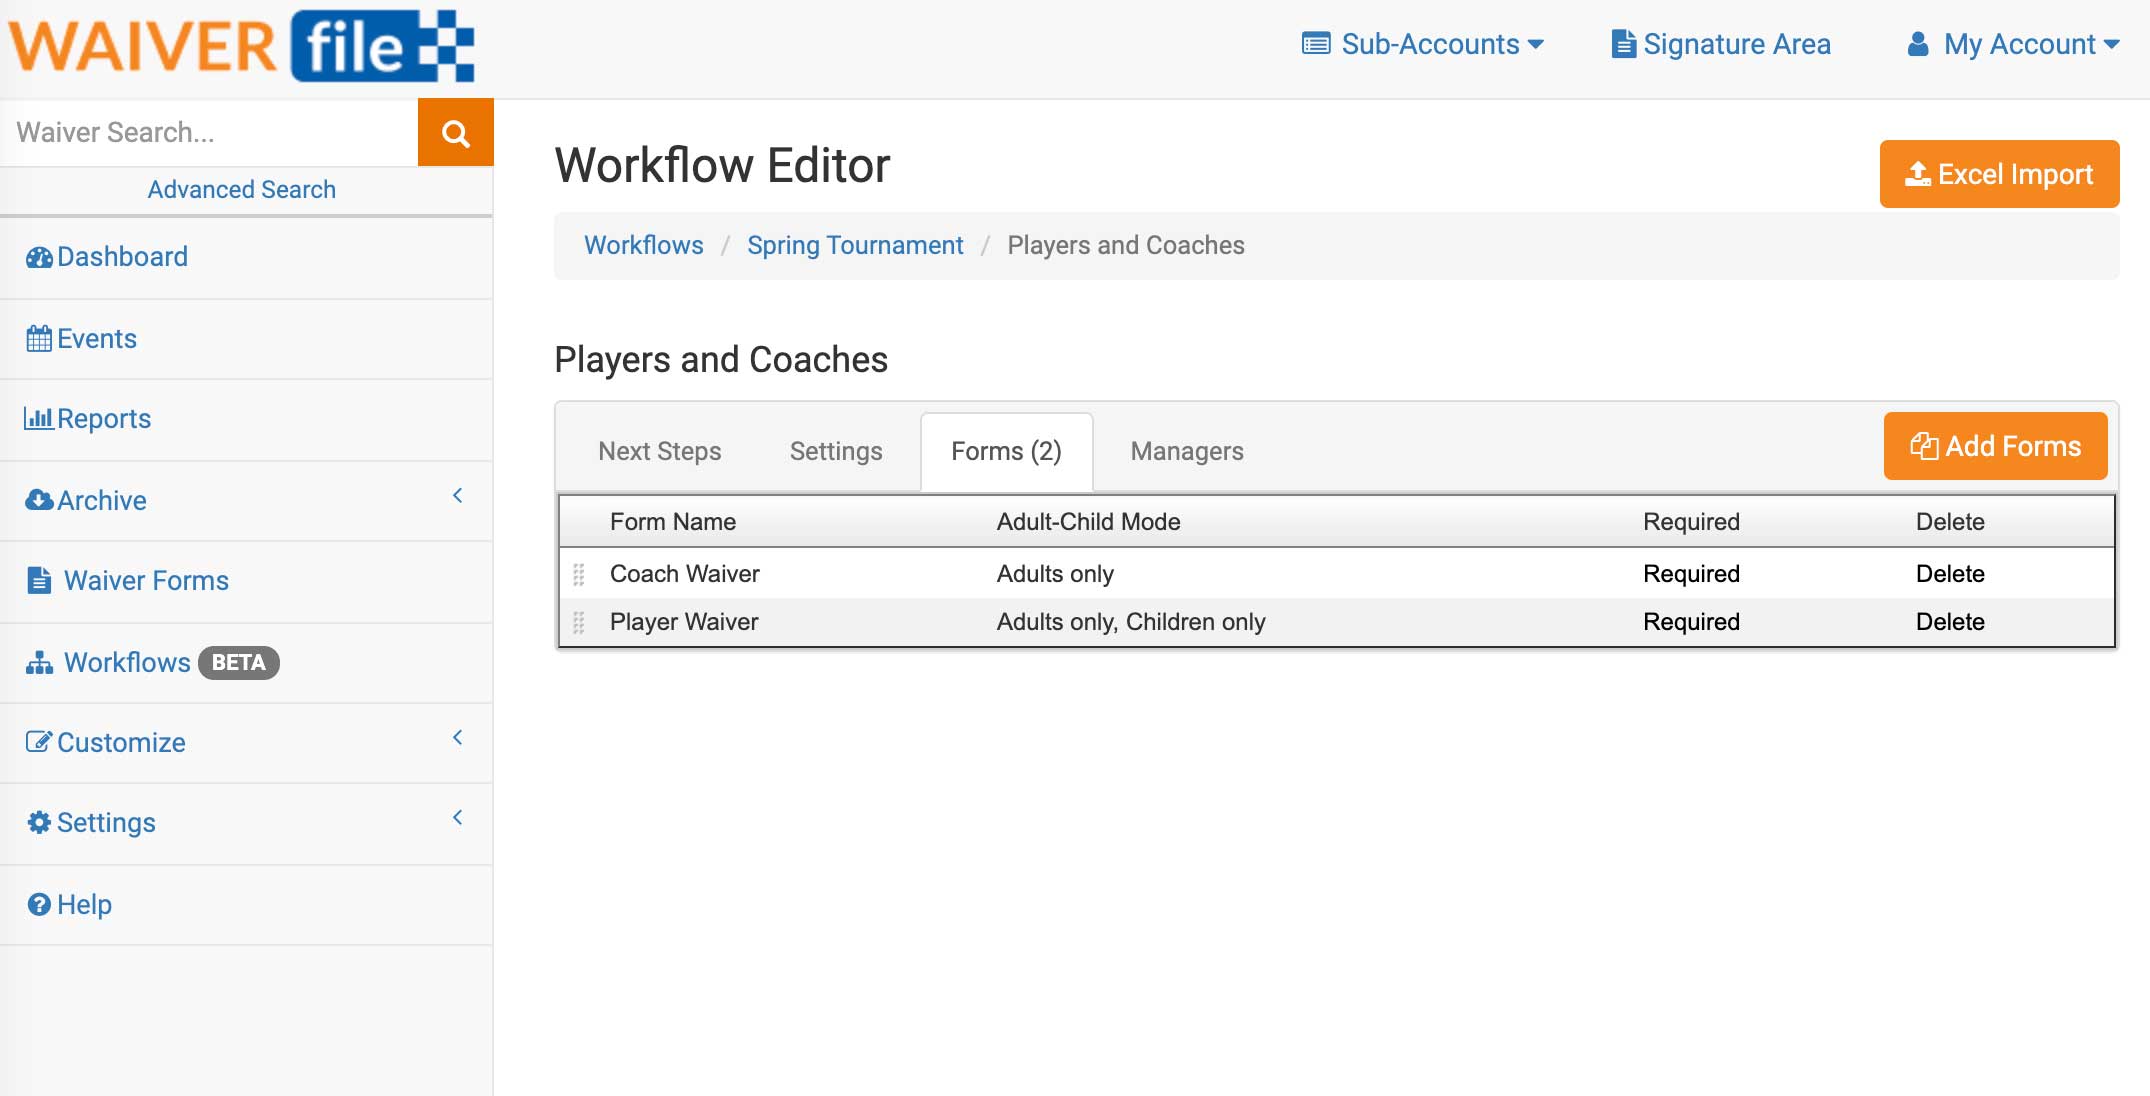
Forms
On this tab, choose which forms are available. Click on Add Forms to select which form(s) will be offered in the current step (or in child steps, depending on the Form Selection Mode). Check the boxes for any forms desired, and choose if they should be made required or optional (if part of a series). Click Add. Drag the forms using the handle on the left to re-order them. Click on the Required column button to swap back and forth to optional.
Managers
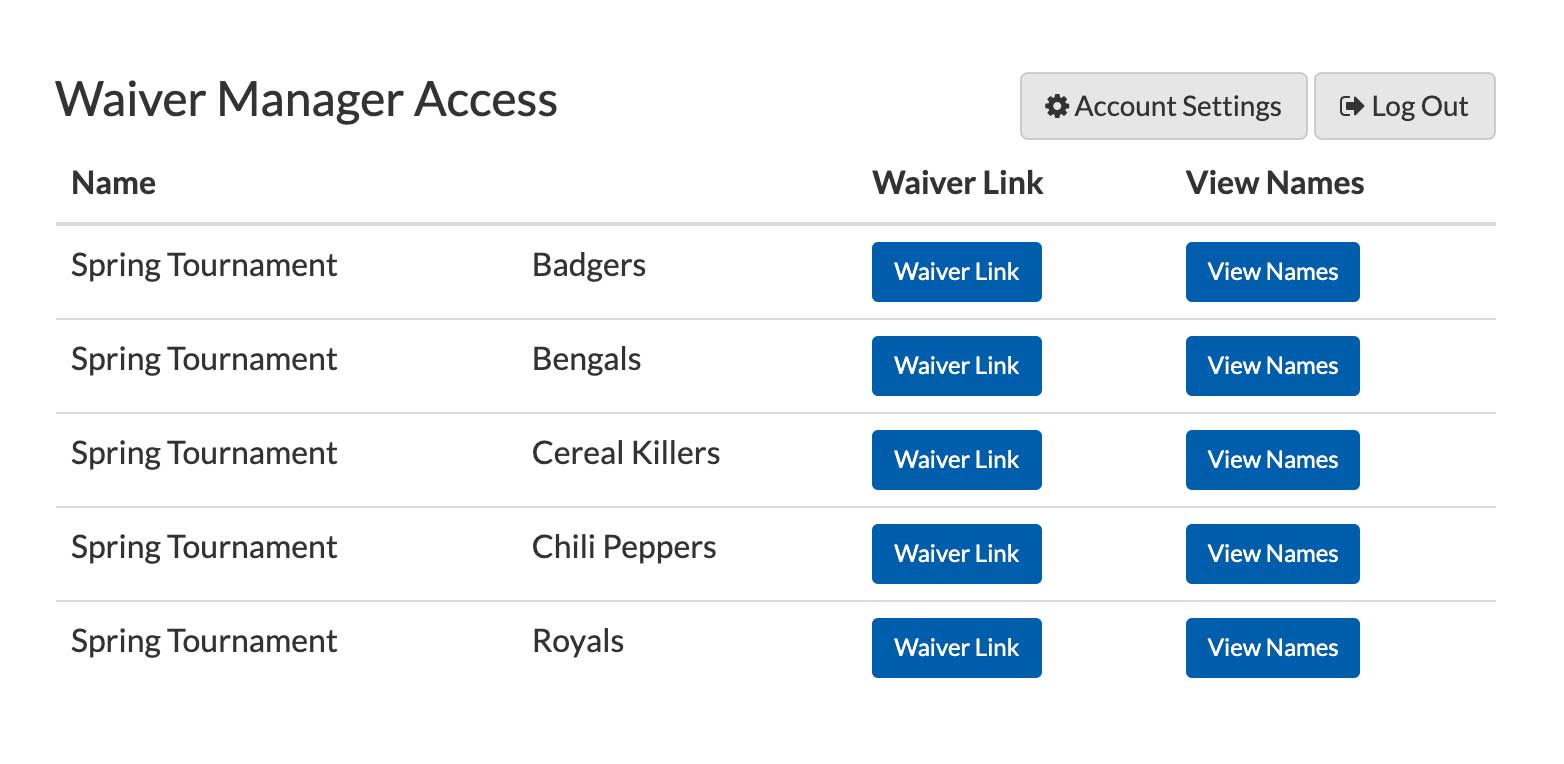
Similar to the event manager feature, you can invite Managers to steps within a workflow. Click Invite Managers, add email addresses and an optional message. Each person will receive an invitation to log in and see participants for the step you have selected. Full waivers are not shown, only a list of names. You can adjust the fields that are shown in Settings >> Event Settings >> Event Manager View Fields. Managers will also receive a direct link to the signature area for their part of the workflow, so they can share it with their guests. Passwords are generated automatically for new users.
Excel Import
When setting up a workflow with a lot of steps, such as importing teams for a tournament, the Excel import function is very helpful. To begin, create the workflow and configure the first step. Then configure any main steps you need. The Excel import will bring steps and settings into a single parent step, so you may wish to run this a few times. For example, if you have a tournament and are splitting teams into girls teams and boys teams, you would create a step for Boys and a step for Girls, then import each set separately.
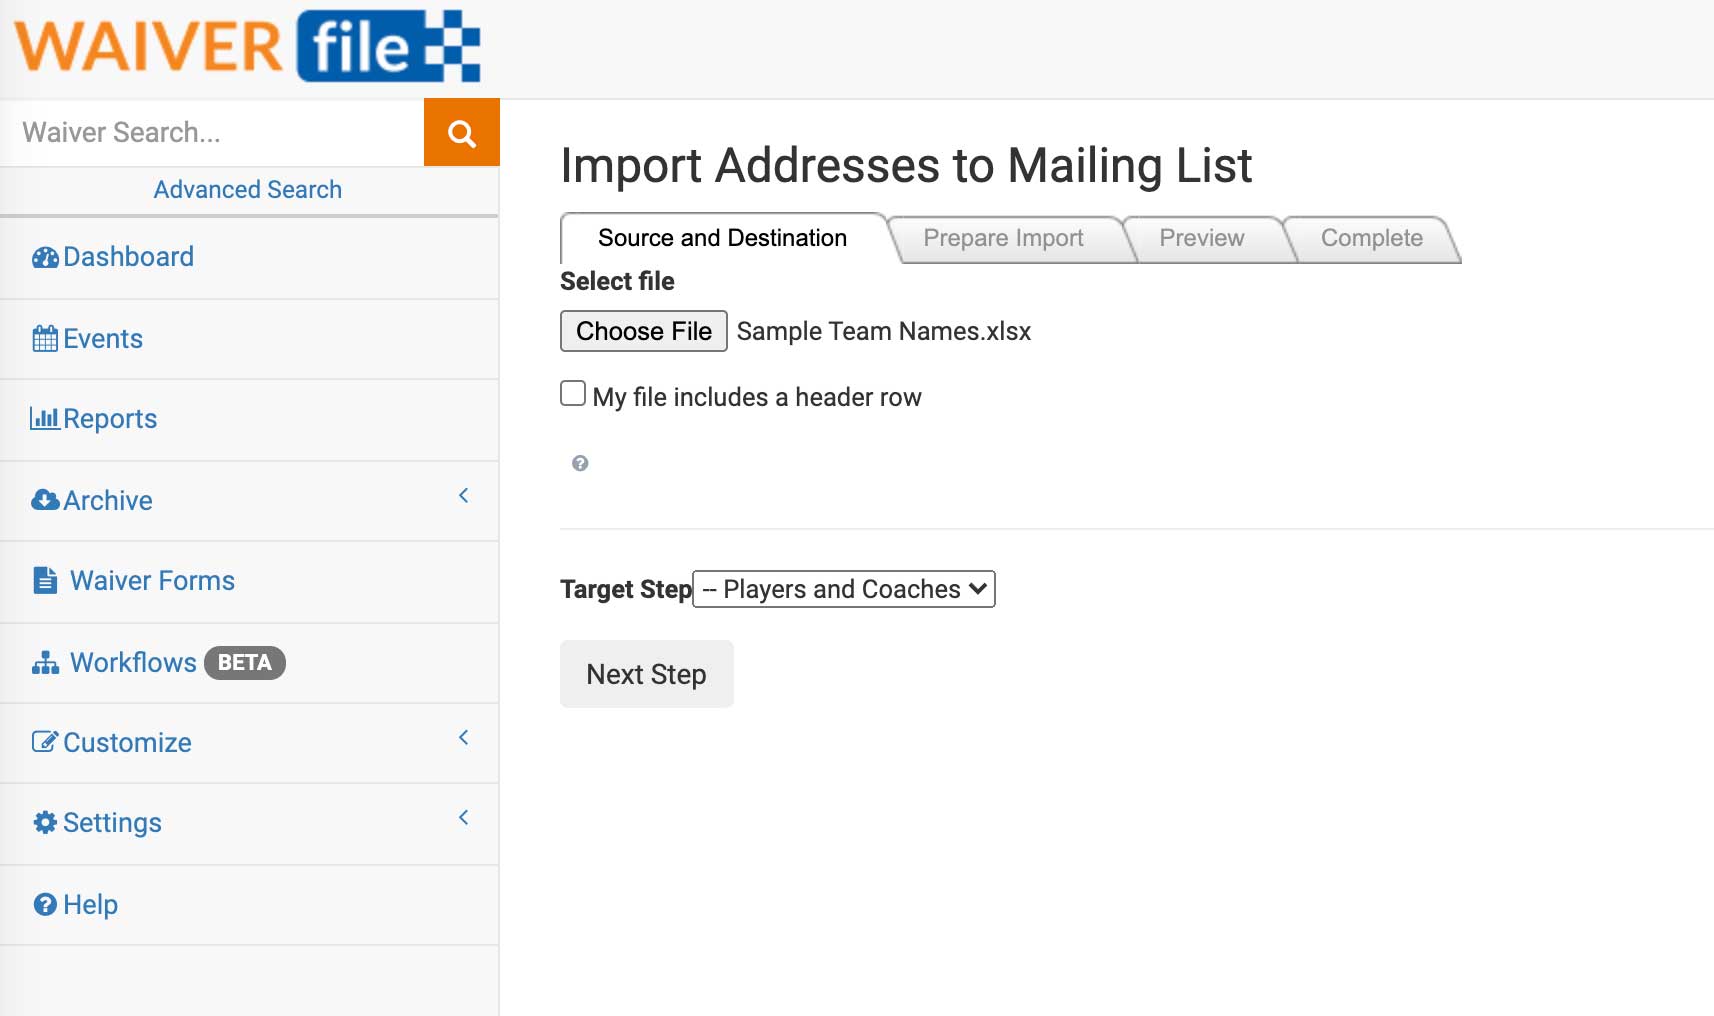
To import, go the step where you are importing and click Excel Import on the top right, then:
- Under Select File, click to find your Excel file.
- Check the box if your data has a header row (the first row has column names)
- Choose your target step in the dropdown list.
- Click Next Step.
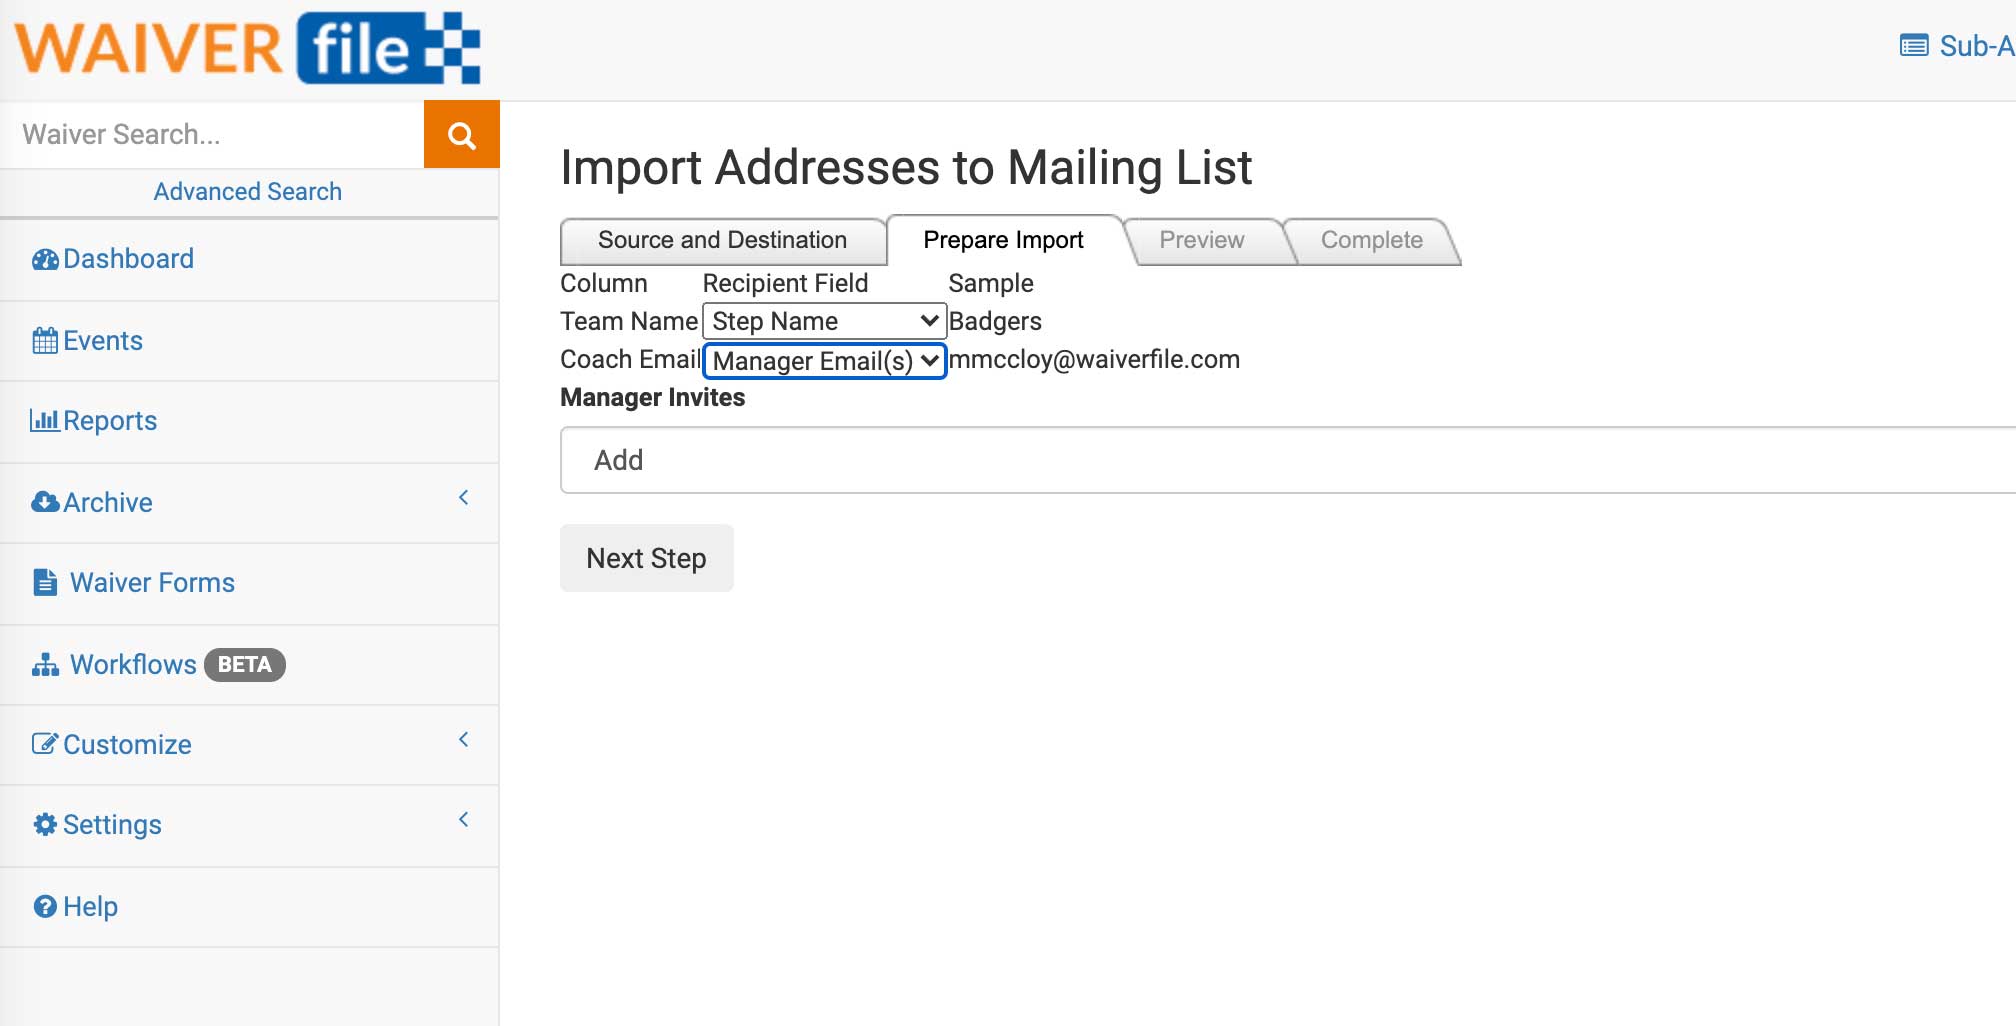
- Configure each of the columns and where they should go. Each one can be:
- Step Name (this will be the button shown)
- Step Title (the page title when viewing this step)
- Step Manager Emails
- You can have multiple columns for email invites if desired. Just map each one to the Manager Email field.
- For the Manager Invites option, choose Add or Replace. Add will append new manager invites to each step. Replace will remove any managers that may already be part of that step (it matches it based on the step name) and then adds the new ones.
- Review the import preview to make sure it looks correct.
- Click Complete Import
Using Workflows for An Event
After creating a workflow, you can use this workflow just as “general admission” signing, where it appears as a button the first page of the signature area, or you can use it within events. To do that, go to Events on the left, then add a New Event. Next to where the waiver forms are listed, you will see a list of workflows. Choose one or more workflows and users will be given a choice of whatever options you select.
Dashboard Changes for Workflows and Multiple Forms
When names appear in the dashboard after signing, if multiple forms were used, the names will be grouped together rather than repeating for each form. If you wish to see which forms were completed for each person, there are new columns that can be added to the dashboard to show this. To set this up, go to Settings >> Dashboard Layout. Under each section click Choose Columns. The columns related to this include:
Form Complete:[Form Name] - you’ll see an option for each of the waiver forms you have like this. This will check off which forms were completed. Use this when you have an optional form and want to see if it was completed at a glance on the dashboard.
Workflow Path - this will show the path of steps each person took to complete their form.
Waivers Completed In Series - this shows a count of waivers that were completed as part of the series.
Reviewing Signed Waivers in a Workflow
To see signed waivers within a workflow, click on Workflows, then click on View Waivers next to the workflow you want to review. Here you will navigate through the steps much like signees do. In each step, you will see a list of signed waivers. You can also add and remove people as needed, for example if someone signed under the wrong step. To move multiple at once, check the box at the beginning of each row and choose the corresponding move button.
Signing Process
The process of signing a waiver within a workflow is designed to be as straight-forward and easy to follow as possible. Users will be shown clean, easy to read buttons for each step. If there are more than 10 steps to choose from within a workflow, a searchable dropdown list will be used instead of separate buttons.
If users are signing multiple waivers in a series, a progress bar is shown on the top of the page so they can see clearly what step they are up to. Forms after the first one will auto-fill information as much as possible to make the process easier and faster. If a form is optional, a skip button will be shown allowing users to jump to the next form in the flow.
Related Articles:
How to Organize Sports Tournaments With WaiverFile Workflows