BIKE RACK ASSEMBLY AND INSTALLATION CHECKLIST
Per the Bike Rack Installation Agreement & Liability Release and Assumption of Risk Agreement, the following Bike Rack Assembly and Installation Checklist (“Bike Rack Checklist”) will serve as:
- Proof of inspection for your vehicle prior to installation
- Rad will inspect your vehicle
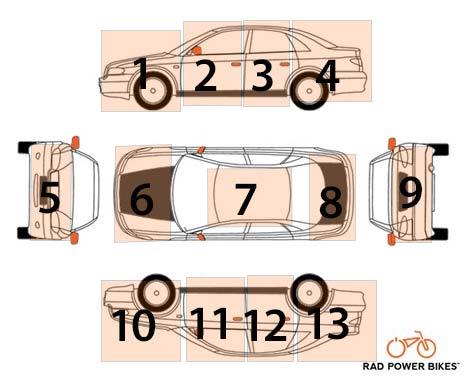
- Rad will mark any pre-existing damage greater than the size of a dime, including, but not limited to, any and all scratches, dings, scrapes, stickers, cloudy spots (glass/windows), and damage that may have been from a prior rack on the Customer Vehicle Inspection figure listed on the next page.
- You will review the marks made by Rad indicating the pre-existing damage. If you and Rad do not agree on the pre-existing damage, Rad will refund you the cost of the assembly and installation, and you can assemble and install the bike rack. If you agree with Rad’s assessment, you will indicate your acceptance and initial below ad next to the Customer Vehicle Inspection figure on the next page:
Initial Here
2. You will examine the bike rack’s condition and notify us of any defects. If you approve of the bike rack’s status you will initial below:
Initial Here Your initials
- A checklist of the manufacturer’s steps Rad will follow for proper installation.
- A post-installation review of the bike rack and confirmation of proper installation
- You will review the installation of the bike rack and then initial the Bike Rack Checklist confirming proper installation.
* ENTER ANY CORRESPONDING NUMBERS BELOW
|
SIGN OFF
|
STEP
|
INSTRUCTION
|
|
|
1: Install Hitch Tube (B) into vehicle’s trailer hitch.
|
Slide the hitch tube B into the 2” trailer hitch until it stops (Fig. 1, 2).
Remove locking head from the locking hitch pin and insert pin through the hole in the trailer hitch and hitch tube until it passes through the opposite side. Be sure the pin passes through the internal tightening loop (located inside the hitch tube, Fig. 3).
Push the locking head onto the end of the pin.
Tighten the front lever until all the play is taken out between trailer hitch and hitch tube (Fig. 4). After tightening, front lever should always be pointed upwards or to the side to avoid damage when going up or down steep driveways.
|
|
|
2: Attach Main Frame (A) to Hitch Tube (B): TOOLS REQUIRED: Two 19mm or ¾” wrenches or adjustable wrenches that open to ¾”
|
Before installing the main beam make sure the landing pin is in place.
Push the plastic sleeve forward so that all three holes are visible.
Retract the front spring pin and align the holes.
Place the main frame A with plastic sleeve into the bracket of the hitch tube B per Fig. 5.
Insert the bolt I and washer through the pivot bolt holes. Install nut and washer to bolt end. Tighten using two adjustable, 19mm or ¾” wrenches. (Figs. 6, 7)
|
|
|
3: Attach wheel support tubes and wheel tube brace to main frame
|
Per Fig. 8, 9, slide the wheel tubes onto the main frame with the wheel tube’s square holes facing up.
Position the tubes so that the holes are aligned.
Position brace H on top of the wheel tubes per Fig. 10, 11.
Insert carriage bolt J through the holes, and install the thick round washer and nut onto the end of the bolt. Repeat for the other three bolts. Tighten using included socket wrench. Refer to Figs. 12-13
|
|
|
4: Install frame hooks & wheel holders:
|
To change the post from folded to “in use” position: rotate & remove the keyed L pin, rotate the post, then re-insert the L pin in the lower hole. Be sure the handle of the pin is pointing downwards to lock it into position. Refer to Fig. 14, 15.
To install the locking frame hooks: Spring loaded buttons on the frame hooks must in the unlocked position per Fig. 18. Place the long frame hook (D) on top of the square post (A) with the hook facing the vehicle. Push the button in and slide the frame hook down onto the post. Repeat for the short frame hook (C) facing in the opposite direction, per Fig. 16. Note: Frame hooks can be installed with the short hook facing the vehicle by using the “ratchet teeth” located on the opposite side of the post.
Using the clamps: Once the clamp is installed, it can only be raised by pushing in the button. To lock the frame hook, insert the key and rotate clockwise, per Fig. 18 Tip: Push down on the plastic housing, not the metal hook Optional post stop screw: If you do not need to remove the frame hooks from the post for bike mounting or removal, then install screw K into post per Fig.17 with Phillips screwdriver.
Install wheel holders: Loosen the knobs on the wheel holders and slide them onto the tubes per Fig. 19.
Final positioning will be done when installing bikes.
|
|
|
5: Installing wheel holder stop screws (Item K):
|
After determining the final position of the wheel holders, install the two stop screws (K) into the bottom of the wheel tubes as indicated in Fig. 20. Use Phillips screwdriver.
|
|
|
6: Fold-up function:
|
Remove the L pin and rotate the vertical post to its folded position. Reinsert the L pin.
Next, retract or pull back the front spring pin per Fig. 21 and rotate the rack towards the rear of the car until it “clicks” into the folded position.
To return the rack to its “in use” position, retract the rear spring pin and gently lower the rack until it clicks into it’s in use position.
|
|
|
7: Tilt-down function:
|
Per Fig. 22, Locate snapper pin. Per Fig. 23, remove snapper pin, retract the front spring pin and gently lower the rack down to its tilted position.
Follow reverse steps to bring the rack back to its “in use” position. Be sure to re-install the snapper pin.
|
|
|
8: Installing bikes on rack
|
Remove battery before mounting bikes on rack. Note: The wheel holders on this rack will fit tire widths up to 5” wide. Please see Fig. 27 below.
Place the inside bike (bike closest to the vehicle) in front of the rack and slide the wheel holders so they align with the bike’s wheels. Try to locate the wheel holders so that the frame hook will rest near the bike’s lowest point of the top tube. Place the bike onto the wheel holders and make final wheel holder position adjustments if necessary. Tighten knobs securely. Push the frame hook down onto the bike’s frame until fully engaged per Fig. 24. (Push down on the plastic housing, not the metal hook). Lock the frame hook. Do not over-compress the padded hook onto the frame. For square shaped top tubes you can use extra padding (such as a sponge or piece of cloth) as needed.
Ratchet strap wheel holders: Rotate the wheel ratchet strap and lay it on top of the bike’s wheel (ratchet teeth “up”). Insert the strap into the buckle and pull tight. Do not overtighten. Repeat for the second wheel. To release the strap, push in the spring loaded tab and pull the strap out of the buckle. Note: Straps should be inserted into the buckle when the rack is not in use.
Carrying two bikes: When carrying two bikes, the handlebars must be staggered. Repeat for the outside bike, with handlebars positioned with the handlebars on the opposite side per Fig. 26. Lock bikes to rack with included security cable.
|
By signing below, you agree that you and Rad have performed all the steps on this Bike Rack Checklist.