How to Setup a Waiver Kiosk
WaiverFile supports signing of waivers in a number of different ways. Customers can sign at home on their own computers as well as on their own smartphones or tablets. WaiverFile’s online signing technology is designed to work on all modern devices and has a wide range of browser support.
For collecting signatures at your location, you’ll want to setup a waiver kiosk. The WaiverFile app is best for this and is available for both iOS and Android devices.
How to Setup a Waiver Kiosk with an iPad
Using an iPad for a waiver signing station is a great choice. iPads are easy to use and durable. We find the on-screen keyboard to be the easiest to use for all tablets. The processing power is also sufficient to ensure a quick, responsive experience for customers completing their forms, even on older models.
Once your WaiverFile account is setup, configuring your iPad kiosk is easy. First, go to the App Store. Search for WaiverFile and install the WaiverFile app. You can also go to the link here:

Once you have the app, open the app and log in. Once you log in, you will be prompted to create a device password. This is a password just for the app on this device so you can access the settings and admin-only areas in the app, even when offline. This can be the same as your account password if you like.
Once that is done, the app will synchronize to your account and configure all your forms and settings. The signature process on the app is largely similar to that of the web based entry. Your customers can use the iPad kiosk to complete their forms and it will operate in a loop, starting over for each customer. If you lose internet access for any reason, the app will store the waivers internally and synchronize them back to the WaiverFile service once internet access is restored.
You can keep your iPad loose and hand it to customers, but we recommend checking out some of the kiosk mounting solutions that are available. See below for a few options that we recommend.
Lock it Down with Guided Access Mode
On an iPad, you can use Guided Access Mode to prevent unauthroized use of your kiosk. This will lock the tablet down to just the WaiverFile app. Watch the video above to learn how, or follow these steps:
- Go to the Settings App on iPad
- On the left, select Accessibility
- Scroll down to Guided Access
- Check the box to turn it on.
- Set a passcode
- Close the settings app.
- Triple tap the home button to enable guided access mode
- To exit guided access, triple tap the home button again and enter your password.
How to Setup a Waiver Kiosk with an Android Tablet
Android tablets are another great way to setup a kiosk for collecting waiver forms. You can purchase tablets from a number of manufacturers including Samsung, Lenovo, Amazon and more. Once you have a tablet, getting started is easy. Go to the Google Play store and search for WaiverFile. Install the WaiverFile app. You can also use the direct link here:

Once you have it installed, log in using your WaiverFile account’s email address and password. You’ll be asked to create a password for this device. This is just a password to access the admin area of the app. We use a separate password so it continues to work even when offline. You can use the same password as your main account if you wish. The app will now synchronize all settings for your account and be ready to collect waivers.
If internet access is available, the app will submit waivers to the WaiverFile service as they are completed. You’ll see them in the dashboard right away. If you’re in a remote area with no service or lose internet for any other reason, the app will store all waivers internally and synchronize them back to the service once a connection is available.
You can mount an android tablet for your waiver station in a number of ways, but see below for some solid mounting options that we recommend.
Waiver Kiosk Mounting Options
A kiosk style enclosure is a great way to setup your tablet for collecting waivers. There are many benefits to setting them up. The first that we often think of is to prevent theft. It’s easy for someone to walk off with a potentially expensive tablet computer in a busy business environment. Keeping the tablet housed in an enclosure helps prevent that kind of theft. Manufacturers also have different options available to further secure the device, including custom screws that thieves are unlikely to have drivers for, key locks and more.
Another benefit is power. In most cases, the enclosure has a path to run a power wire. You can setup the power cord so the tablet is always powered up and in many cases the cord can’t be accessed from the outside so it won’t become accidentally unplugged.
Driver’s License Tray
If you plan to collect images of driver’s licenses or other card-sized media, be sure to check out the tray option from Vault enclosures (linked below). This is a tray that aligns with the camera on your tablet so you can capture a clean, consistent image of a license or card. It makes it easy for customers to just place their card in the tray and continue the process.
Here are a few options for waiver kiosks tablet enclosures:
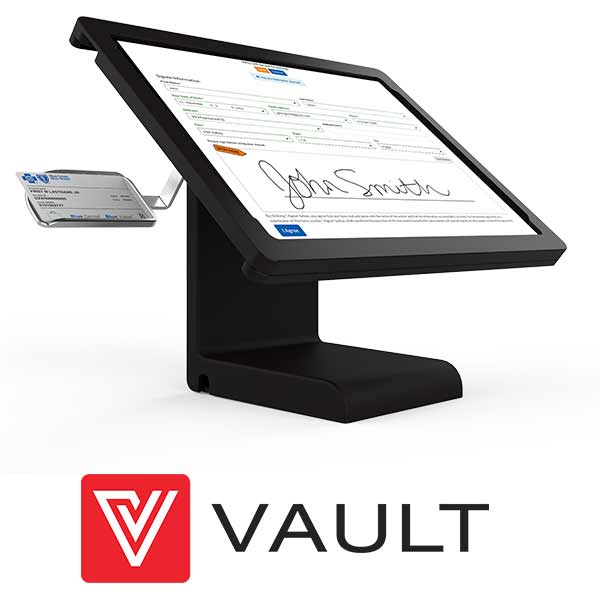
Vault Enclosures
Vault makes solid metal enclosures that are sturdy and look great. Be sure to check out the card tray option if you plan to collect driver’s licenses or other card-sized media:
https://byvault.com
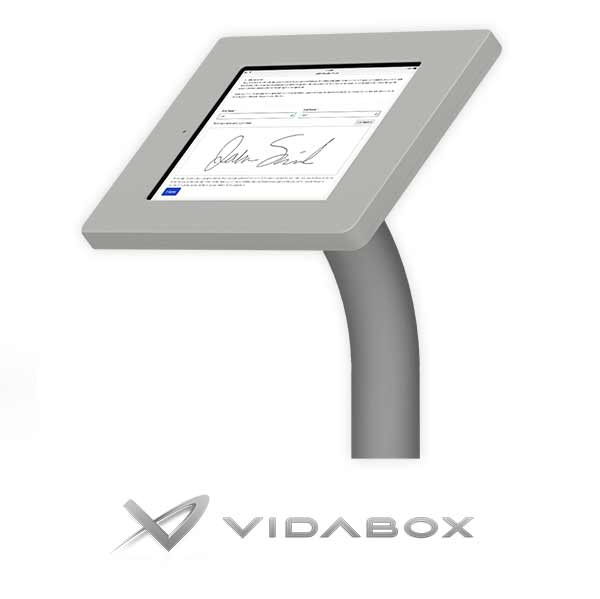
Vidabox Kiosks
Vidabox manufacturers a wide variety of mounting options for tablets and other devices.
https://www.vidabox.com
Using a Windows Computer and Google Chrome in Kiosk Mode for Waiver Entry
If you are using a Windows computer as a waiver entry station, we have found that Google Chrome is a great tool for configuring that machine as a Kiosk. You can configure it to open full screen in kiosk mode to your WaiverFile signature area, and we've also added a new auto-print option as well. Let's go over how to set this up.
1. Download and install Google Chrome
Chrome is a free browser from Google. Follow the link below to download a copy:
https://www.google.com/chrome/
2. Add a shortcut to Chrome on your desktop
If you don't already have a shortcut there, you can add one:
- Right click your desktop and click New >> Shortcut
- You can use the browse link to find the Chrome application.
The default installation location is:
C:\Program Files (x86)\Google\Chrome\Application\Chrome.exe
- Choose this and continue making the shortcut
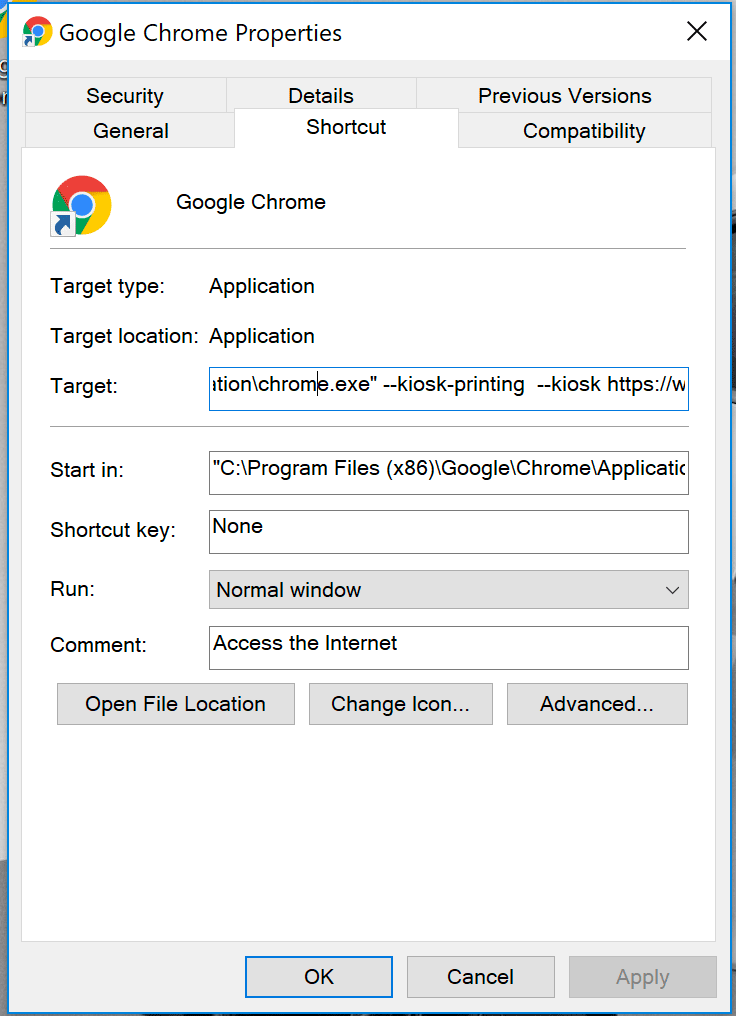
3. Customize your shortcut to use kiosk mode:
- Right click your new shortcut, and select Properties
- Click the Shortcut Tab
- In the field labeled "Target", add the following options AFTER chrome.exe:
- --kiosk-printing --kiosk https://www.waiverfile.com/d/YOUR ADDRESS
- Be sure to swap out the YOUR ADDRESS portion with your own WaiverFile signing address.
- Click OK
4. Optionally, enable auto-printing
If you have your kiosk connected to a printer, you may want to automatically print a copy of each waiver or a receipt. To make this work, in your WaiverFile admin dashboard, you can setup automatic printing. When enabled, a copy of the form will automatically print after signing. If you would rather it be a receipt or some other format, please contact us and we can help customize what is printed.
Here's how to enable the automatic print function:
- Go to your WaiverFile admin dashboard
- Go to Settings >> General Settings
- Down near the bottom, the page is split into two columns. Under the Device Version, check the box that reads "Auto Print Receipt"
- Click Save at the bottom of the page.

If you only want specific waiver forms to auto-print, after enabling the auto-print feature you can disable it for individual forms. To do so:
- Enable the Auto-Print Receipt feature as shown in screenshot above
- Go to Waiver Forms on the left-hand menu
- For each form that you do NOT want to auto-print, click on Advanced Settings
- Check the Disable Auto-Print box
- Click Save